Enhancing User Experience Through Ongoing Optimization

When someone starts talking about testing, one of any number of things can come to mind. There is testing that ensures the site looks the way that it is supposed to. Some testing is done to make sure a website functions as expected. You can even have tested to confirm that a piece of code produces the correct result every time. Recently, we have become very interested in a completely different kind of testing called A/B and multivariate testing.

A/B and multivariate testing are two flavors of the same type of testing where the intention is to find a user experience that most effectively meets some merchant goal. The process we follow is to create two or more versions of the same page within your site and present them to the customer to see which achieves your goals more effectively. It is one easy and cost-effective way to improve a merchant’s site usability and conversion.

“But where do I begin? What should I test?”

As a merchant, you may say, “This sounds great, but my site has thousands of pages. Which one do I optimize?” To answer this question, a merchant must ask one important question: “What is my most important business goal?” In eCommerce, the most common goal is to increase customer conversion rates by some amount or to increase average order value by some amount to ultimately drive more revenue. Some other common goals may be to increase customer retention, to increase customer satisfaction, or to fix some “problem” with your website.

Once you’ve identified your goal, the next step is to analyze any metrics you can get around that goal. For the purpose of demonstration, we have chosen to discuss the topic of conversion levels. We utilize Google Analytics (GA) or any other conversion tracking tools you may have set up to set up GA goals, track them, and measure their current conversion rates. We also analyze where users are abandoning the site and use this information to identify the most promising page or pages to implement our testing.

Before implementing an A/B test, the next important step is to come up with a hypothesis about why you think users are leaving your site on this page.

Some steps you can take to brainstorm options are

  • Research some user interface/user experience best practices.
  • Research colors, fonts, and wording that may enhance your site’s usability and experience.
  • Go to the problem page(s) and count the number of clicks it takes you to accomplish your goal. How many distinct pages have to load between when you enter the site and when you have completed your order?
  • Find someone in your company who does not regularly use the website and ask them to be overly literal, then try to explain to them step-by-step how to use the “problem page.” Do this again on a comparable page on a more prominent shopping website like Amazon or eBay to see how your user experience compares holds up.

After you follow these steps, document your hypothesis, what you plan to test and why/how you expect it to impact your conversion goal.

Once you have come up with a hypothesis, it’s time to implement the test. There are a few great tools to help you get started with A/B testing. Our tool of choice is Optimizely, which is a great online tool that allows us to change the layout of your page, colors, text, fonts; launch the test, then track the results. We are able to do all of this with only a very slight modification to the actual site’s code which means the time to implement the tool is very minimal compared to some other methods which can be expensive or time consuming to implement. It also has built in analytics and works with Google Analytics to track conversion and other more comprehensive metrics.

We will work with you to implement the test and allow you to see the different versions that will be displayed to different groups of customers. Once your test is running, it is important to let it run long enough to reach a statistically significant result. A good rule of thumb is to let the test run for at least two weeks and have at least 100 conversions. Optimizely will also let you know once a test has reached a statically significant result and will declare a winner.

If the test version has won, it’s time to implement those changes and document the results. It’s important to keep documentation of each test you’ve completed so that you can reference and utilize the data for future tests.

At this point, your test is complete but now that Optimizely is installed and you understand how to find and create candidates for testing, the amount of time to implement another test has been reduced. You can now begin to implement a more long term strategy for improving your conversion, working toward other goals, and continually making small but meaningful improvements to your site. Optimization is an ongoing practice that should be done repeatedly to keep your site as relevant, profitable and effective as possible. It is important to remember that not every test will be better than the original, but that is why testing is so important instead of making changes without information about how your specific group of customers will react.

How We Work with You

The Classy Llama User Experience team consists of expert designers and front-end developers who look forward to helping you improve your site’s user experience and increase conversion rates. We start with an initial review of your current site analytics and do some brainstorming around recommended areas of improvement. Goals are defined and a roadmap for testing is established before testing begins. Upon conclusion of each test, a detailed report including findings and recommendations will be delivered. Based on these test results, we will make adjustments and evaluate opportunities for future improvements.

For more information, email [email protected] or call (417) 866-8887.

Using PHP Native Password API with Magento

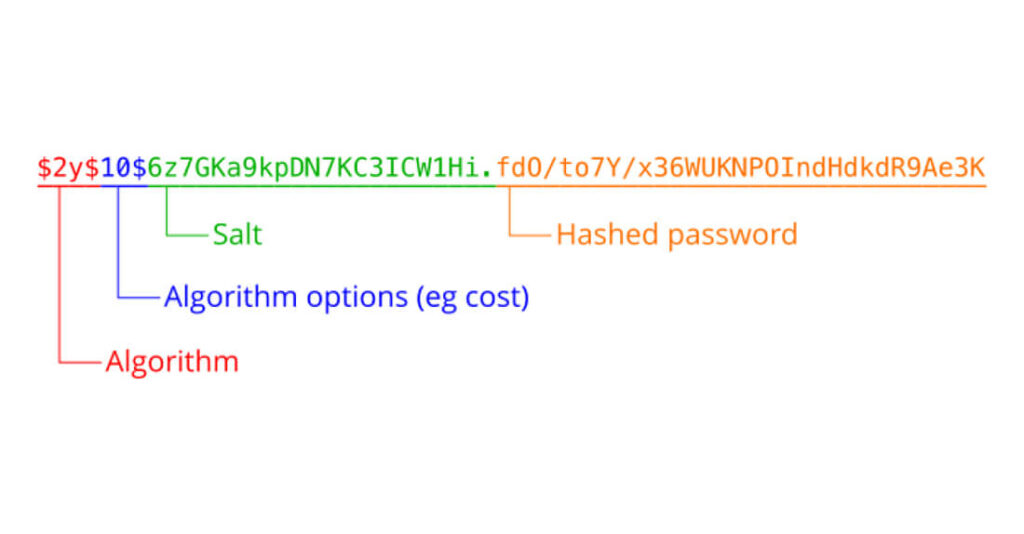
Overview

Despite efforts from the industry, corporate data leaks from web applications are happening with increasing frequency. A specific implication of these leaks is that they often expose customer password information, potentially compromising the customer’s account not only on the site where the leak occurred but possibly many others, as customers tend to reuse the same password on many different sites.

With this in mind, it is the duty of each merchant and developer to safeguard such customer information.

Magento addresses the security of customer passwords by using the industry standard pattern of storing passwords using a one-way hash. This mechanism does not provide a way to directly retrieve a password from its hash – the only sure way to “unhash” a hash is by brute force (trying every single possible value). Brute forcing is hopefully prohibitively expensive and time-consuming, which ensures the security of hashed passwords.

Problem

The effectiveness of Magento’s password hashing relies heavily on the choice of the hashing algorithm. Currently, Community Edition 1.9.1.0 uses MD5, and Enterprise Edition 1.14.1.0 uses SHA256.

While these hashing algorithms are widely used in the industry, they suffer a core design flaw which makes them unsuitable for securing information.

According to PHP password hashing recommendations:

Hashing algorithms such as MD5, SHA1 and SHA256 are designed to be very fast and efficient. With modern techniques and computer equipment, it has become trivial to “brute force” the output of these algorithms, in order to determine the original input.

Because of how quickly a modern computer can “reverse” these hashing algorithms, many security professionals strongly suggest against their use for password hashing.

Solution

Considering how many applications need to securely store passwords, PHP provides a native password hashing and verification API. This API allows developers to easily store and validate passwords without having to research, reimplement, and maintain the wide range of best practice details that are required to truly be secure.

Additionally, this native API is designed to evolve over time – as better hashing algorithms or other best practices are discovered, it can transparently improve its implementation without requiring developers to update code.

Technical details

Along with other best practices, such as constant time string comparisons, unique salt, etc, the PHP native password API uses the currently recommended bcrypt hashing algorithm. This is designed to change over time, so hash strings produced by the native API include all required information to verify the hash.

PHP native password API hash string example, from PHP password hashing FAQ.

Example of PHP native API hash string with breakdown

Because of this, a hash string created by the native API is always forward compatible with future versions of the verification API.

The PHP native password hashing API is available in the PHP core since version 5.5.0. Additionally, there is a pure PHP compatibility library for versions of PHP since 5.3.7. Due to a security issue in PHP versions 5.3.6 and below, merchants and developers should upgrade at least to 5.3.7.

Magento implementation

In order to improve its password hashing security, I have created a PHP native password hashing API Magento module. The module is compatible with both Commerce Edition and Open Source Edition and includes the native API compatibility library, making it compatible with PHP versions 5.3.7 and above.

This module adds three system configuration options, which can be found in System -> Configuration -> Customers -> Customer Configuration -> Password Options.

  • Use PHP Native Password Hashing: this setting fundamentally enables/disables the module. In order to “do no harm”, the module is disabled by default, so it is critical to set this value to Yes in order to upgrade Magento password hashing.
  • Password Hashing Cost: advanced users can adjust this value to possibly improve password hashing security at the cost of server CPU load. The default is appropriate for nearly all sites.
  • Rehash Legacy Passwords: this setting allows Magento to upgrade password hashes which were created using legacy hashing algorithms. When a customer or admin successfully authenticates using a password with an unsuitable hash, the password will be rehashed using the native API. In order to “do no harm”, this functionality is disabled by default, but it should be set to Yes to begin to retroactively upgrade the site’s password hash database.

Where to get it

This module is liberally licensed and freely available on GitHub: https://github.com/ericthehacker/magento-phpnativepasswords.

It can be easily installed using modman, as described in the installation instructions. As mentioned above, it’s critical to enable the module’s functionality in system configuration after installation.

As always, issues or contributions are welcome!

Unravelling Magento’s collectTotals: Invoices and Credit Memos

Previous Entries

Quite some time ago (well over a year, in fact), I published a series of articles on Magento’s cart totals collection process (linked above), how it works, and how to customize it. The series provided a guide for introducing entirely new totals, but any intrepid developers trying out this procedure might have discovered a missing piece: While the previous articles offered a step-by-step for getting new totals into the cart and onto the final order, more effort is required for these totals to make it onto the order’s invoices and credit memos. If your order fulfillment process occurs within Magento, fancy custom totals can hardly be of any use without support for these components. Therefore, it’s about time to explore these final pieces.

Why Invoice and Credit Memo Collectors?

The chief complexities of the totals process we’ve looked at have been in the collector models that perform the necessary calculations while an order is still in the cart/checkout stage. Once a cart becomes an order, totals are just a series of numbers that need to be copied to that order.

One might expect the process to be just that simple – as simple as copying numbers – when an invoice or a credit memo is created. And if an order only ever produced a single invoice, this might be the case. Complexity enters in again, however, due to the ability to invoice or refund only a portion of an order. If I’m currently invoicing only 2 of the 5 items for an order, Magento needs to know how to calculate how much of each and every total should be part of the invoice. For the native shipping total, the entire amount is always included in the first invoice. For the tax total, however, the process is more complicated, requiring calculation to be done for specific invoiced items.

This level of complexity is starting to sound like what we faced in the cart process. And in a manner of speaking, that’s exactly what we have again – a “cart” being built toward the creation of an invoice or a credit memo rather than an order, and potentially involving different calculations. After all, we’re going to have to consider things like what amount has been invoiced previously. So you’ve probably guessed by this point what we’re dealing with: dedicated collector models just for this purpose.

A Familiar Process

Luckily, having peered under the hood of how to quote (i.e., cart) totals are declared and managed, we’re well equipped to understand invoice and credit memo totals because the process is much the same. Step one is to declare these totals and the models associated with them in configuration XML. Here are examples from the core:

    . . .


                . . .
                
                    sales/order_invoice_total_shipping
                    subtotal,discount
                    grand_total,tax
                
                . . .


                . . .
                
                    sales/order_creditmemo_total_shipping
                    subtotal,discount
                    grand_total,tax
                
                . . .


    . . .

And as with quotes and orders, the majority of totals will involve new fields to store the appropriate amounts on the invoice and credit memo tables, and in some cases, the invoice item and credit memo item tables as well. As an example, the fields “tax_amount” and “base_tax_amount” exist in the following tables:

  • sales_flat_invoice
  • sales_flat_invoice_item
  • sales_flat_creditmemo
  • sales_flat_creditmemo_item

The declared total models contain a “collect” method, just like their quote counterparts. The “fetch” method that was necessary for quote totals, however, isn’t present in this case. This is because the display process for invoice and credit memo totals cleaves much closer to that of orders than to the way things are handled in the cart. (I’ll delve into that shortly.)

A final note about the basic process of defining totals: We previously examined the use of the config node “fieldsets” to transfer amounts from quote to order. (The node “global/fieldsets/sales_convert_quote_address/shipping_amount/to_order” is responsible for a quote’s shipping total making it to the resulting order.) You won’t find the same procedure for order-to-invoice or order-to-credit-memo, though. This process will work; defining the node “global/fieldsets/sales_convert_order/shipping_amount/to_invoice” will indeed result in an order’s shipping amount being copied to every invoice created from it. This isn’t really what we want, though. To reiterate, the totals calculation for invoices and credit memos isn’t simply a matter of copying numbers; if I create three credit memos from the same order, I hardly want the order’s full tax amount refunded on each. (And doing so without a collector model still won’t successfully affect the credit memo’s grand total, as we’ll see.)

A note for clarity: Just as the collectTotals process is run each time we view a cart on the front-end, re-calculating all amounts with each change, the same is true when the creation of an invoice or credit memo is in progress. As the invoice is being prepared and updated (by the admin user changing quantities to be invoiced, for example), the collection process runs over and over to update the totals we see. It’s not a process that occurs only on the final creation of the invoice (or credit memo).

A Look at Displaying Totals

The block class Mage_Sales_Block_Order_Totals and its children, Mage_Sales_Block_Order_Invoice_Totals and Mage_Sales_Block_Order_Creditmemo_Totals, are responsible for the rendering of totals in order confirmation emails and the account section in the front-end. The related classes Mage_Adminhtml_Block_Sales_Order_Totals, Mage_Adminhtml_Block_Sales_Order_Invoice_Totals, and Mage_Adminhtml_Block_Sales_Order_Creditmemo_Totals take this job for the admin. Here is an example of a block declaration in a layout XML file:

<adminhtml_sales_order_view>
    . . .
    <reference name="left">
        <block type="adminhtml/sales_order_view_tabs" name="sales_order_tabs">
            <block type="adminhtml/sales_order_view_tab_info" name="order_tab_info" template="sales/order/view/tab/info.phtml">
                . . .
                <block type="adminhtml/sales_order_totals" name="order_totals" template="sales/order/totals.phtml">
                . . .
            </block>
        . . .
        </block>
    </reference>
    . . .
</adminhtml_sales_order_view>

In the previous entry “Orders and Caveats” in this series, I initially claimed that rewriting these blocks were required to successfully display custom totals at the order stage, only to backpedal on this thanks to some helpful advice from Vinai Kopp! Since the display of invoice and credit memo totals works the same way as orders, this provides us an excellent opportunity to go back and explore the better alternative.

Each of these blocks calls “initTotals” on any of its child blocks that have such a method. If we define such child blocks for custom totals, these classes can, in turn, grab their parent and call addTotal or addTotalBefore to modify the totals array, thus eliminating the need for block rewrites. Here’s an example of adding a custom total block to each parent within layout XML:

<adminhtml_sales_order_view>
    <reference name="order_totals">
        <block type="mymodule/sales_order_totals_mytotal" name="total_mytotal" />
    </reference>
</adminhtml_sales_order_view>

<adminhtml_sales_order_invoice_new>
    <reference name="invoice_totals">
        <block type="mymodule/sales_order_totals_mytotal" name="total_mytotal" />
    </reference>
</adminhtml_sales_order_invoice_new>

<adminhtml_sales_order_creditmemo_new>
    <reference name="creditmemo_totals">
        <block type="mymodule/sales_order_totals_mytotal" name="total_custom_mytotal" />
    </reference>
</adminhtml_sales_order_creditmemo_new>

And the example code for the block itself:

class Me_MyModule_Block_Sales_Order_Totals_Mytotal 
    extends Mage_Core_Block_Abstract
{
    public function getSource()
    {
        return $this-&gt;getParentBlock()-&gt;getSource();
    }

    /**
     * Add this total to parent
     */
    public function initTotals()
    {
        if ((float)$this-&gt;getSource()-&gt;getMyTotalAmount() == 0) {
            return $this;
        }
        $total = new Varien_Object(array(
            'code'  =&gt; 'mytotal',
            'field' =&gt; 'mytotal_amount',
            'value' =&gt; $this-&gt;getSource()-&gt;getMyTotalAmount(),
            'label' =&gt; $this-&gt;__('My Total')
        ));
        $this-&gt;getParentBlock()-&gt;addTotalBefore($total, 'shipping');
        return $this;
    }
}

The only cumbersome part is making sure to apply this update to all of the appropriate layout handles. Here is a list of relevant layout update handles in the front-end:

  • sales_order_view
  • sales_order_invoice
  • sales_order_creditmemo
  • sales_order_print
  • sales_order_printinvoice
  • sales_order_printcreditmemo
  • sales_email_order_items
  • sales_email_order_invoice_items
  • sales_email_order_creditmemo_items
  • sales_guest_view
  • sales_guest_invoice
  • sales_guest_creditmemo
  • sales_guest_print
  • sales_guest_printinvoice
  • sales_guest_printcreditmemo

And here are the relevant handles in admin:

  • adminhtml_sales_order_view
  • adminhtml_sales_order_invoice_new
  • adminhtml_sales_order_invoice_updateqty
  • adminhtml_sales_order_invoice_view
  • adminhtml_sales_order_creditmemo_new
  • adminhtml_sales_order_creditmemo_updateqty
  • adminhtml_sales_order_creditmemo_vie

A complete explanation of customizing these areas will be included in the comprehensive example that concludes this series.

A Simple Start

Beyond the simple declaration of invoice and credit memo totals, the important question is how their calculations differ from those in a quote. If you have an eye for building your own custom total, that’s the crux of the matter you’ll have to decide for yourself: How do you want the amount to be calculated when only a portion of an order is invoiced or refunded? Is your custom total fully payable immediately on the first invoice (like the native shipping total)? Does your custom discount need to be re-calculated for the entire order if one item is refunded (and the amount applied to the refund adjusted accordingly)?

These are the tough questions to work through, but at the very least the native total collectors give some insight into what data is available for your calculations and how to get at it. To start with, let’s assume a custom total is tracked only on the entire order, rather than on individual items, and that we have no need to split it up between multiple invoices or refunds. The native “collect” methods on Mage_Sales_Model_Order_Invoice_Total_Shipping and Mage_Sales_Model_Order_Creditmemo_Total_Shipping provides us an equivalent example and demonstrates some of the things we’ll need to deal with.

  • “getOrder” can be called on both the invoice and credit memo models (passed as parameters to the respective “collect” methods) to retrieve totals or other information directly from the order.
  • An order’s “getInvoiceCollection” and “getCreditMemosCollection” methods will be important for retrieving any past invoices or credit memos that have been created (and thus any amounts already invoiced/refunded). When looping through invoices, the convenient method “isCanceled” can be used to exclude invoices that are no longer valid.
  • You’ll see frequent use of calls like “getShippingRefunded” on the order model. As handy as this is for finding out what amount of a total has already been invoiced/refunded, it relies not only on dedicated fields in the order table, but also the updates to these fields carried out in the invoice and credit memo models’ “register” methods that occur when these entities are finally saved. For custom totals, you can establish similar “total_name_invoiced”/”total_name_refunded” fields on the order table and use the “sales_order_invoice_register” event to update them, or simply fetch previous invoice or credit memo collections to obtain the data.
  • There is no “_addAmount” method here as in the quote totals. Instead, amounts need to be set directly on the invoice or credit memo – not just the specific total amount, but the adjusted grand total as well.

Here’s an incredibly stripped down version of an invoice “collect” method for a hypothetical custom total:

    public function collect(Mage_Sales_Model_Order_Invoice $invoice)
    {
        $invoice->setMyTotalAmount(0);
        $invoice->setBaseMyTotalAmount(0);

        foreach ($invoice->getOrder()->getInvoiceCollection() as $prevInvoice) {
            if ($prevInvoice->getMyTotalAmount() && !$prevInvoice->isCanceled()) {
                return $this;
            }
        }

        $myTotalAmt = $invoice->getOrder()->getMyTotalAmount();
        $baseMyTotalAmt = $invoice->getOrder()->getBaseMyTotalAmount();

        $invoice->setMyTotalAmount($myTotalAmt);
        $invoice->setBaseMyTotalAmount($baseMyTotalAmt);

        $invoice->setGrandTotal($invoice->getGrandTotal()+$myTotalAmt);
        $invoice->setBaseGrandTotal($invoice->getBaseGrandTotal()+$baseMyTotalAmt);

        return $this;
    }

Digging Deeper

If your custom total does need to be tracked per item, or if you need to divide it between multiple invoices and credit memos, you likely have some more complex calculations to do in your models. If we look to some of the other native totals logic (such as in Mage_Sales_Model_Order_Invoice_Total_Tax and Mage_Sales_Model_Order_Creditmemo_Total_Tax), here are some additional useful details we can glean:

  • Naturally, when looping through an invoice’s or credit memo’s items via the “getAllItems” method, the corresponding order item can be retrieved with “getOrderItem.”
  • And speaking of order items: These models contain the handy method “isDummy”, providing a useful and straightforward check for items that should be ignored in any calculations. (These come into play when a single order line item is represented by both a parent and child record for a composite product. A configurable product’s child items are considered “dummy” items, while in the case of bundled products, it’s the parent item that is.)
  • Both the invoice and credit memo models have an “isLast” method frequently used in totals collection. An invoice or credit memo is the “last” when the quantities being invoiced/refunded represent all of the remaining quantities on the order. Where an amount can be split over multiple invoices or refunds, it’s a best practice to use this check to calculate the last differently in order to safeguard against rounding errors or other unexpected calculation issues. (For example: “For any invoice that is not the last, invoice a percentage of the order total based on item quantities. For the last invoice, invoice remaining un-invoiced portion of the order total.)
  • Note that a credit memo can be created in the context of a specific invoice, or merely in the context of the entire order. If the details of the specific invoice being refunded factor into total collection, the appropriate model can be retrieved with “getInvoice” on the credit memo.

NOTE: Use the “isLast” check with caution, as it is apparently unreliable in the case of composite products being invoiced/refunded. In my testing, I observed this “isLast” method resulting in a false negative when configurable products were present in the invoice. “isLast” on an invoice or credit memo model runs an identically named method on the relevant items, which compares the current quantity with the quantity left to invoice/refund. However, the aforementioned “isDummy” condition is applied in one case and not the other, leading to an inaccurate comparison. Luckily, the logic performed here is not difficult to duplicate, and you can perform the same basic check in your own collection logic with this issue corrected. (Look for an example in the final article in this series.)

In summary, the collection process for invoices and credit memos doesn’t differ fundamentally from that of quotes (at least in terms of technical implementation). Whether the calculations involved are simple or headache-inducing, the exploration touched on here should illuminate how Magento treats these components of the order lifecycle.

The example that comprises the last article in this series (linked below) has been updated with the inclusion of these long overdue final missing pieces.

Next entries

Promotion Craft – The Art of Creating Successful Online Promotions

She wants what your site is selling. Really wants it. Wants it so much she’s comparing colors, reading reviews, scouring social media, and watching videos on YouTube about it. So why isn’t she buying? You haven’t given her enough motivation to pull the trigger. She’s almost ready, she just needs a gentle nudge. That’s where successful online promotions come in.

Right now, you have a group of customers who emotionally want your products. More of them would purchase if you would give them enough reasons to justify the decision to buy now. When you start with this premise in mind, then successful promotions become easier to craft. In essence, you are creating a scenario where your customers and prospects will likely say, “OK, I’ll buy now” rather than waiting a week, a month, or a few months.

Here are 6 things to keep in mind that will help you become a master of crafting successful promotions.

1. Start with an irresistible offer.

Most promotions fail because the offers behind them are, well, resistible. Pedestrian offers like save 10% will do little to generate customer excitement and motivate immediate spending. Before you cry out, “but my margins are slim! I can’t offer big discounts,” never fear. You might not need to discount at all to create an irresistible offer. Here are 3 categories of irresistible offers to consider:

Deal/Discount Based – If you ask a merchant to craft an irresistible offer, their minds will almost certainly gravitate toward big discounts. Irresistible offers are less about how big the discount is, and more about how creative you are in the execution of the promotion. Sure, big discounts command attention, but you don’t have to give 50% off to have an irresistible deal offer. You can do straight discounts – and sometimes odd discounts work well. Let’s say you’re celebrating your 13th anniversary. Offering 13% off all orders on your 13th anniversary can be a fun and motivating sale. You can also bundle products which are a form of discounting but doesn’t feel like you are cheapening your products. You can offer to double reward points on certain days if you offer a rewards points program. My favorite local smoothie joint offers double punch Tuesdays and they are usually slammed on Tuesdays. Then, of course, you can offer the big discounts if you have the margins to allow for it. I’m a big fan of the buy-one-get-one (BOGO) or buy one get one 25-50% off. You could also offer a spend X and get a free gift card. That gift card could then be sent to a friend or relative which could bring in a new customer for you, or the gift card could be used by the original buyer.

Experience Based – Customers don’t just buy for utility. Experience is a big driver of purchases especially for older and/or more affluent buyers or just in certain product categories. Why shell out $75 per person at a nice Sushi restaurant when Wendy’s is right around the corner? It’s the experience, not just the filling of the belly that’s dictating the decision. What can you do as an online merchant? Consider upgrades to better shipping options. Or, consider offering personal shoppers available via chat or phone who will do the initial shopping for you. What about virtual events like cooking classes with a famous sushi chef if you sell cookware, or video demonstrations from tournament champion fishermen if you selling fishing equipment? What about doing something crazy for big B2B accounts who spend a lot with you? I know a B2B company with decent margins who runs a promotion every few years for their top 15 customers that if they spend 15-20% more than they did the year prior they get to go on an all-expenses-paid cruise. The decent margins and the resulting increase in spending make this a good deal for the B2B merchant. It’s important to note that the cruises have a strangely appealing effect on buying – more so than a discount of the same value. Here are some fun experience-based offers to consider:

Marketing Multipliers – What is something that, when purchased or experienced, causes customers to consume or buy more of what you offer. For Amazon, it’s their Prime membership that offers a Netflix-like selection of streaming movies and TV shows and then free 2-day shipping on almost any item. Conservatively, Prime members spend nearly twice as much as non-members. In some places, I’ve seen Prime members say their spending went up 2-9x after becoming a member. When Amazon offers a free trial of Amazon Prime or when they throw in an annual Prime membership with the purchase of the Amazon Fire TV or Amazon Fire Phone (which turned out to be a pretty resistible phone product, initially) they are giving away something that will multiply consumption. How could you craft a membership similar to that of Amazon Prime, and use it mainly as an offer and a marketing multiplier?

Wishlist event – This is one of my favorite event ideas. I don’t know of anyone online who are doing this right now. Here’s the premise. Have customers fill out a wish list. Run the promotion for 2-4 weeks to maximize sign ups. Then at the end of the contest randomly select someone to win their entire wish list for free. You can cap this at $500, $2,500, or whatever you want, but make sure it makes signing up irresistible. Then, for those who don’t win, email them and offer a discount for a limited time on their wish list items that they want to purchase. Better yet, make part of the registration process entering the name of the boyfriend or girlfriend or spouse of the person registering. Then after the promotion, you can send an email to that significant other, saying “good news we know what she wants this Holiday Season.” I originally helped craft this idea for an offline jewelry store. It worked like gangbusters.

Contests – Contests can range from the basic, enter-to-win sweepstakes, to something that takes a little more effort from participants. Encourage customers to write the best product description for your new product, or create a demonstration video of your product in action. The winner get’s $250 in store credit (or whatever amount you can offer that will foster excitement).

Information Based – Some product categories warrant the consumption of information. Hobby-related products like golf, cooking, hunting or “hot button” issues like financial planning or survival planning, or zombie apocalypse planning all lend themselves well to information offers. Offering How-to guides, eBooks, or a “How to Bag the Biggest Buck” video series when you buy $200 at XYZsportinggoods.com can be truly motivating offers. What information can you offer that your market is clamoring for that could also entice them to buy more of your stuff?

How do you know if you have an irresistible offer? Crafting a truly irresistible offer takes some practice and experimentation. Here are a few litmus tests to see if your offer is on the right track:

The Squirm Test – Does it make you a bit uncomfortable? Does it make the owners or CFO squirm just a little? Then you’re likely on the right track to creating something irresistible.
The Shrug Test – Share the offer with people in your office or, better yet, your target market and watch their reaction. Does it create wide-eyed excitement or dull stares and shrugs? If you get the shrug, your offer is very resistible. The Share Test – Does your offer lend itself to sharing? If customers are inclined to share your offer and if you encourage the sharing of your offer, you can seriously leverage the communication of your offer.

2. Reason why copy

Don’t just run a sale or promotion without sharing why. People always want to know why. If you don’t give them a reason, they will invent one or simply become skeptical of your offer. Don’t worry, people don’t need much of a reason. Often simply naming your event will take care of the why question. Call it a Customer Appreciation Event, or Cyber Monday Sale, or Back-to-School event. That gives your customers the ability to see why you are offering something. Sounds simple, but it is important.

3. Leverage your platform

Magento, Shopify, BigCommerce – they all have native functionality or functionality easily available through extensions that can greatly boost your promotion’s performance. Don’t miss out of the benefits of this functionality.
If you’re using Magento consider some of these features:

  • Rewards Points: Double your points for the weekend. (as a side note, we love rewards points and the native functionality that Magento offers, but you have to consider fraud mitigation with rewards points.)
  • Private Sales and invitations
  • Flexible coupons and tiered pricing – buy x get y, buy x get fixed amount discount, tiered discounts
  • Shopping cart upsells

Some platforms offer cool gift card features that allow for balance checking, personal email messages, and unique gift amounts. Want to give someone a $22.87 gift card just for fun? You can with several platforms and extensions.

4. Leverage your communication

Always go multi-channel unless your promotion is strictly limited to your current VIPs. Even then, you’ll likely want to use a couple of channels. Make sure you have a multitouch plan for email (usually no less than 3 emails per promotion). Don’t hesitate to use remarketing ads (why not convert your remarketing ads to promote your offer while it’s available), Facebook ads, Twitter, and even your blog to leverage the offer. Also, look for people who will amplify and share the promotion and encourage them to do so.

5. Think customer development, not just one-time sales bump

What long-term effect will this promotion have on my customer relationships? Extend the life of the sale by asking customers to share their story of what they bought with the best story shared socially earning a free T Shirt or something fun.

6. Experiment

Test. Not every promotion will be a winner. Sometimes the promotion you think will be mediocre will actually drive huge sales numbers. Conversely, the promo that you think is a can’t miss might turn out to be a dud. We just had a client who offered free shipping for a weekend to everyone on their email list. That might not sound earth-shattering, but it was their biggest promotion to date. Sometimes really simple stuff has a big impact. Test, tweak and test some more.

So don’t just run the same old canned and tired promotions that most merchants run. Get creative. There are a lot of would-be customers out there, wallet in hand, waiting for you to help them make a decision to buy. Don’t let them down.

Enjoyed this post?

You’ll love our recent Llama Commerce Show dedicated to this topic. Classy Llama CEO, Kurt Theobald, and Lead Strategist, Brett Curry, discuss and debate the fundamentals of rock solid online promotions.

Debugging Complex Problems

Recently, I posted about avoiding common coding problems. These practices can help to reduce debugging overall time. Even after common coding issues have been reduced, you are often still left with a need to debug more complex problems. These are the bugs that you either didn’t write, which are sometimes buried in the core of the framework or application on which you are working (in our case, Magento), or that stem from incorrect or incomplete logic. These types of problems can often require a variety of techniques to debug, especially when the bug is in the code you neither wrote nor have seen.

Example

The Problem

A client was having a problem where no product on a grouped product page was able to be added to the cart. All qty text boxes were hidden, and it was ultimately represented the same way an out of stock grouped product was represented.

Debugging Methodology

  1. Start Simple
  2. Check for common mistakes
  3. Check the quickest things first
  4. Isolate the specifics of the problem
  5. Isolate the source of the problem
  6. Determine the factors that could possibly impact the source of the problem
  7. Create logs to determine which factor is the culprit
  8. Fix the bug whether code, user, or data related

Solution

1. Capture the Current State

The first step before doing any debugging is to create a copy of the database. Sometimes, especially with complex eCommerce sites with multiple integrations, a problem can be difficult to isolate. If I accidentally “fix” the problem while debugging it, my efforts at fixing the problem long term can be delayed until the problem occurs again. It is also good practice to debug apart from production if the problem can be reproduced in a development environment.

2 & 3. Check for Quick Fixes & Common Mistakes

Once I had that backup, I start by checking things in the Magento admin like stock, qty, product status, product websites, product visibility, etc. of the parent grouped product and its child simple products. In this case, I determined that according to the admin, all of the products had satisfactory attribute values. There were at least a few products that were enabled, in the appropriate website, in stock, with a qty greater than the out of stock qty level, and attached correctly to the grouped product. Next, I went to the code that determines whether a product is eligible to be purchased. This code is somewhat spread out, but I determined with a fair degree of certainty that there should have been products eligible to purchase.

4. Isolate the Specifics

Because I had determined that this problem was most likely not caused by a simple mistake and I had checked the quickest things, I moved on to isolate the specifics of the problem. Since the quantity text boxes were hidden, I knew that whatever logic was causing the products to not be able to be added to the cart was associated with the grouped product page. I opened up lib/Zend/Db/Adapter/Abstract.php, the file that processes most of the actual SQL calls that Magento uses and their bindings before the query is sent to the DB, and added some log statements. I logged every query that was made along with its associated bindings. I then created a log before the products on the grouped product page were loaded and a log after they were loaded. By doing this, I was able to determine which queries were most likely responsible for determining whether the products should be eligible for addition to the cart.

A new tool from Zend, called Z-Ray, would have made this query logging process simpler since it automatically displays all queries when enabled. I highly recommend using this tool for debugging your applications since it makes your debugging information available to you without having to add any logging or enable profiling.

5. Isolate the Source

Next, I then looked for a query that looked like it was dealing with stock. With this query in hand, I went to the database and ran the query to see its results. There were no valid results from this query. I now had the specifics of the problem (no valid stock items being returned from the DB), so I started removing filters from the query until it would return rows. By using this method, I was able to determine that the problem was related to the stock status that was set on the grouped product itself. I had isolated the source of the problem.

6. Determine Factors Affecting the Source

I next investigated where in the code this stock status was set and what conditions were used to determine whether the stock status should be in stock or out of stock. I determined that the stock status was supposed to be “in stock” based on the conditions in the code where stock status was updated. According to the code, the conditions should have produced an “in stock” status, but the grouped product was nevertheless “out of stock.” This explained why I had not found anything wrong with the attributes of grouped and associated simple products when I had done my initial debugging in my “check the quickest things” first step. Since I knew that in this case, stock, which is stored on the simple product, was being updated dynamically through the Magento API, I looked at the logic that determined stock status from this stock information. Sure enough, there was a separate set of logic for generating stock status compared to if the stock item were updated through the product admin section. Since the stock status code was distinct for updating stock via the API and I was not able to reproduce the problem by saving the same stock levels on the product in the admin, I determined that I needed to either create sandbox API calls or log the live integration. Saving in the product actually was fixing the problem, which gave me clear evidence that I needed to find out what the API was doing differently.

7. Create Logs to Identify the Culprit

Because the budget was more of a constraint than the timeline, I opted to log data on the live integration and wait for the next time this was broken. I fixed the data temporarily by saving a few grouped products and set up logging statements that would allow me to see the API parameters, the stock items, the stock status, and the sql queries for each API call. By doing this, I was able to determine the exact API call/parameters used to allow me to create a non-API based sandbox call and step through the stock status update process in a debugger since I had determined the factors that impacted the source of the problem and logged their values. Since I was trying to identify why a grouped product’s stock status was false, I identified the array that was supposed to contain a list of the child simple products stock statuses keyed by their ids. The array that was returned for the child products statuses was an array with only a single key/value pair where the key was a 1 and the value was a seemingly random number.

By looking at the code that was generating the child product stock statuses, I was able to identify the problem. The query that was getting statuses from the database was switching the order of the keys and the values. The stock status, which was a 1, was being represented as the key and the key was being represented as the value. Since the stock status for each child product was 1, the resulting array was a key of 1 and a value of the final child product id. The children products’ stock statuses were then being used to update the parent stock status and since there was no valid child product stock status marked as in stock, the parent product was being marked as out of stock.

If you would like to view the relevant methods where I found this problem, you can look at Mage_CatalogInventory_Model_Resource_Stock_Status::saveProductStatus and Mage_Catalog_Model_Resource_Product_Status::getProductStatus in the else section under the $select and $rows variable assignment. I was working with EE 1.12.0.2 but the error likely exists in or around CE 1.7.0.2 as well.

8. Resolve the Issue

I was able to fix the problem with a simple rewrite of the Mage_Catalog_Model_Resource_Product_Status class by changing the order of the columns in the select in the getProductStatus() method.

Ultimately, by following the steps listed in the debugging methodology section above, I was able to identify the problem relatively quickly. The order of the steps I followed is important because at any point I may have identified the problem and not had to continue debugging the problem. I highly recommend using the above methodology or similar to arrive at a solution most quickly and ultimately save time, money, and frustration.

Magento Translation, Step Zero: What Must Be Translated?

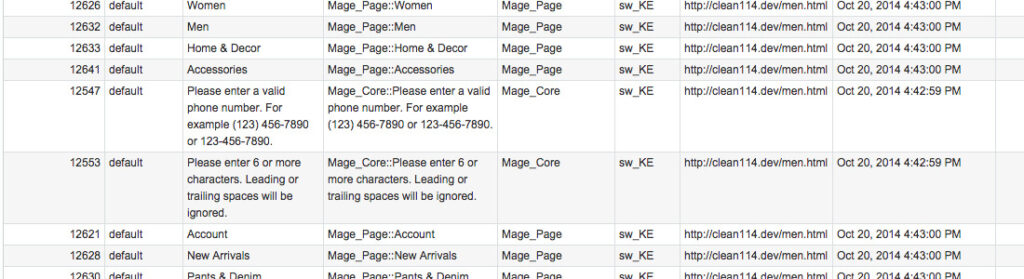
Internationalization is an increasingly important consideration for Magento merchants developers looking to expand market penetration and increase usability. A significant part of this effort is realized in the form of maintaining translations for multiple locales – quite the undertaking, in spite of Magento’s robust localization capabilities.

However, a journey of a thousand miles begins with a single step, and this initial step can be particularly daunting. What must be translated?

Ideally, every string ever used, be it backend or frontend, would be documented so that an exhaustive list is always available of material scheduled for translation. In practice, however, this is rarely the case – maybe the site or module wasn’t initially slated for an international market or the ROI was difficult to justify. Because of this, orphan strings with no record of their existence are very common and a barrier to internationalization.

Wouldn’t it be nice to have a mechanism to retroactively examine a site or module and perform a translation gap analysis?

Approach

One approach to ferreting out untranslated strings is to modify the translation tool itself to report untranslated strings as they are encountered. This is often expressed as a quick hack to the translation classes whereby strings are logged, then the changes reverted.

The basic idea is solid, but the execution is essentially a transient hack – requiring repeated discovery and implementation, and is prone to oversights.

After a recent internationalization-intensive project involving several countries and localizations, I attempted to formalize this approach into a robust module.

Translation path

When calling the familiar __() method (whether from a block, helper, controller, etc), Mage_Core_Model_Translate::translate() is invoked to do the actual heavy lifting.

Mage_Core_Model_Translate::translate()

/**
 * Translate
 *
 * @param array $args
 * @return string
 */
public function translate($args) {
    $text = array_shift($args);
    
    if (is_string($text) & amp; & amp;
    '' == $text || is_null($text) || is_bool($text) & amp; & amp; false === $text || is_object($text) & amp; & amp;
	'' == $text - & gt; getText()) {
		return '';
	}
    if ($text instanceof Mage_Core_Model_Translate_Expr) {
        $code = $text - & gt;
        getCode(self::SCOPE_SEPARATOR);
        $module = $text - & gt;
        getModule();
        $text = $text - & gt;
        getText();
        $translated = $this - & gt;
        _getTranslatedString($text, $code);
    } else {
        if (!empty($_REQUEST['theme'])) {
            $module = 'frontend/default/'.$_REQUEST['theme'];
        } else {
            $module = 'frontend/default/default';
        }
        $code = $module.self::SCOPE_SEPARATOR.$text;
        $translated = $this - & gt;
        _getTranslatedString($text, $code);
    }

    //array_unshift($args, $translated);
    //$result = @call_user_func_array('sprintf', $args);

    $result = @vsprintf($translated, $args);
    if ($result === false) {
        $result = $translated;
    }

    if ($this - & gt; _translateInline & amp; & amp; $this - & gt; getTranslateInline()) {
		if (strpos($result, '{{{') === false || strpos($result, '}}}') === false || strpos($result, '}}{{') === false) {
			$result = '{{{'.$result.
				'}}{{'.$translated.
				'}}{{'.$text.
				'}}{{'.$module.
				'}}}';
		}
    }

    return $result;
}

After doing some heuristics to determine exactly what module and code to use for context, Mage_Core_Model_Translate::_getTranslatedString() takes over.

Mage_Core_Model_Translate::_getTranslatedString()

/**
 * Return translated string from text.
 *
 * @param string $text
 * @param string $code
 * @return string
 */
protected function _getTranslatedString($text, $code)
{
    $translated = '';
    if (array_key_exists($code, $this->getData())) {
        $translated = $this->_data[$code];
    } 
    elseif (array_key_exists($text, $this->getData())) {
        $translated = $this->_data[$text];
    } 
    else {
        $translated = $text;
    }
    return $translated;
}

If a translation by either code or text exists, then it is returned – otherwise, the key (untranslated string) is returned.

Implementation

The Mage_Core_Model_Translate::_getTranslatedString() method offers a perfect opportunity to detect strings with no translation and record them.

String Detection

Unfortunately, there is no event present which can be observed to accomplish this detection, so the model must be rewritten. Using the lightest touch possible for such a fundamental model, the string is preprocessed before translation to determine if it is missing translations for interesting locales.

EW_UntranslatedStrings_Model_Core_Translate::_getTranslatedString()

/**
 * Evaluate translated text and code and determine
 * if they are untranslated.
 *
 * @param string $text
 * @param string $code
 */
protected function _checkTranslatedString($text, $code) {
    Varien_Profiler::start(__CLASS__ . '::' . __FUNCTION__);
    Varien_Profiler::start(EW_UntranslatedStrings_Helper_Data::PROFILER_KEY);
    
    //loop locale(s) and find gaps
    $untranslatedPhrases = array();
    foreach($this->_getLocalesToCheck() as $locale) {
        if(!Mage::helper('ew_untranslatedstrings')->isTranslated($text,$code,$locale)) {
            $untranslatedPhrases[] = array(
                'text' => $text,
                'code' => $code,
                'locale' => $locale
            );
        }
    }
    $this->_storeUntranslated($untranslatedPhrases);

    Varien_Profiler::stop(EW_UntranslatedStrings_Helper_Data::PROFILER_KEY);
    Varien_Profiler::stop(__CLASS__ . '::' . __FUNCTION__);
}

/**
 * Check for translation gap before returning
 *
 * @param string $text
 * @param string $code
 * @return string
 */
protected function _getTranslatedString($text, $code)
{
    if(Mage::helper('ew_untranslatedstrings')->isEnabled()) {
        $this->_checkTranslatedString($text, $code);
    }
    
    return parent::_getTranslatedString($text, $code);
}

This simple change allows the module to collect untranslated strings, which, for performance sake, are batched up and flushed to the database in a single query after the page is rendered. All that is required to perform this collection is to enable the module in the system configuration, and browse the site – a perfect scenario for stage sites during ongoing UAT.

Multiple Locales

If a merchant or developer is concerned about translation gaps for one locale, he is likely also concerned about several others. This is facilitated by the loop in _checkTranslatedString() which iterates over multiple locales which are ultimately retrieved from the system configuration.

To check the status of translations other than the currently selected locale, EW_UntranslatedStrings_Helper_Data::isTranslated() performs evaluations independent of current store configuration, aided by getTranslator() which provides ready-to-go translator models for any locale and store ID.

EW_UntranslatedStrings_Helper_Data::isTranslated() and getTranslator()

/**
 * Get translator prepared for given locale
 *
 * @param $locale
 * @param bool $allowMatchingKeyValuePairs - matching key / value pairs count as translations
 * @param null $storeIdContext
 * @param bool $forceRefresh
 * @return EW_UntranslatedStrings_Model_Core_Translate
 */
public function getTranslator($locale, $allowMatchingKeyValuePairs = null, $storeIdContext = null, $forceRefresh = false) {
    if(!isset($this->_translators[$locale])) {
        if(is_null($allowMatchingKeyValuePairs)) {
            // "allow" and "log" are opposite concepts
            $allowMatchingKeyValuePairs = !$this->logMatchingKeyValuePairs();
        }

        /* @var $translate EW_UntranslatedStrings_Model_Core_Translate */
        $translate = Mage::getModel('ew_untranslatedstrings/core_translate');
        $translate->setConfig(
            array(
                Mage_Core_Model_Translate::CONFIG_KEY_LOCALE => $locale
            )
        );
        $translate->setLocale($locale);
        $translate->setAllowLooseDevModuleMode(true); //prevent native dev mode differences
        $translate->setAllowMatchingKeyValuePairs($allowMatchingKeyValuePairs);
        if(!is_null($storeIdContext)) {
            $translate->setThemeContext($storeIdContext);
        }
        $translate->init(Mage_Core_Model_Design_Package::DEFAULT_AREA, $forceRefresh);

        $this->_translators[$locale] = $translate;
    }

    return $this->_translators[$locale];
}

/**
 * Does text/code have translation for given locale?
 *
 * @param $text
 * @param $code
 * @param $locale
 * @return bool
 */
public function isTranslated($text, $code, $locale) {
    /* @var $translate EW_UntranslatedStrings_Model_Core_Translate */
    $translate = $this->getTranslator($locale);

    return $translate->hasTranslation($text, $code);
}

While it requires a few more rewritten methods on the translator model, this feature allows a store owner or developer to quickly assemble a gap analysis of multiple locales at once.

Configurability

Although simple in concept, there are several optional tweaks that can make this feature much more useful for efficient string collection.

This module adds a new system configuration section which can be found at Advanced -> Developer -> Untranslated Strings.

System Configuration Screenshot

These options allow several powerful options for customizability. For example

  • Admin translation gaps can be ignored – useful to enable for all websites, but purposely omit admin strings.
  • Matching translation key/value pairs can be either logged or ignored. This accommodates either of the following scenarios:
    • Complete translation gap analysis, where strings which are represented but not actually translated are logged – useful for merchant site evaluation.
    • String representation gap analysis, where only strings which are not represented at all are logged – useful for module developers who only wish to maintain a list of strings and are not concerned with actual translation.
  • Translation code exclusion patterns which omit some strings from the log. Magento has many native translation gaps, and the translation status of some modules may be irrelevant to a given store. This allows final users to tweak the signal-to-noise ratio to ensure efficient use of resource when evaluating untranslated strings.
  • Batch locale translation gap analysis. As mentioned before, this allows the evaluation of several locales at one time, greatly reducing the time required to collect an exhaustive list of strings.

Reports

Even the most robust untranslated string detection is useless if the results are not easily accessible and actionable.

To this end, there are two new reports which are now available at Reports -> Untranslated Strings in the main admin menu.

  • Untranslated Strings Summary: this provides an overview of translation gaps by locale and store, and allows the ability to purge or truncate untranslated strings.
  • Untranslated Strings Report: this provides a detailed view of untranslated strings and is filterable by locale, store, popularity, etc.

Additionally, the Untranslated Strings Report allows strings to be exported to CSV file. Combined with its filtering capabilities, this allows a merchant or developer to effectively manage the strings and provide them to translation teams, along with all important context.

Untranslated Strings Report Screenshot

Maintenance

Viewing the untranslated strings report as a sort of “to-do list”, the summary view allows merchants or developers to curate the remaining untranslated strings. In particular, the strings associated with a given locale and store can be truncated (individually or en masse), cleaning the slate and allowing a fresh set of strings to be collected.

More powerful, however, is the purge option. Exercising this option on a locale and store (or group of these, via the mass action functionality) causes the module to reevaluate the translation status of associated strings, removing any which are now considered translated according to the system configuration settings.

After adding translations to address gaps, this feature allows merchants and developers to cull strings which are no longer relevant, ensuring that the untranslated string list is always actionable.

Where to go from here (caveats)

While this module goes a long way to formalize a former “hacky” process, there is always room to improve. Some particular things to keep in mind:

  • This module only assists with strings which are wrapped in translate calls – if strings are simply never translated, there is no way to detect them. On the same token, strings which are meant to be translated using admin store scopes (such as product attributes, CMS blocks, etc) are not evaluated.
  • The module introduces a small to moderate performance overhead depending on the number of locales to be evaluated and the number of untranslated strings. Fortunately, this is only realized if the functionality is enabled in system configuration.
  • As with Magento’s inline translation tool, the module works best if translation and block caches are disabled.
  • Like the shoemaker’s wife, the module itself has a few translation gaps …

Where to get it

If you’d like to get your hands on this open source module and take the first step toward internationalization, you can find it on Github:

https://github.com/ericthehacker/magento-untranslatedstrings

As stated in the readme, it’s easily installed via modman. Use it wisely!

Interested in building an international e-commerce store or looking to upgrade the one you have? Let us know on our contact form!

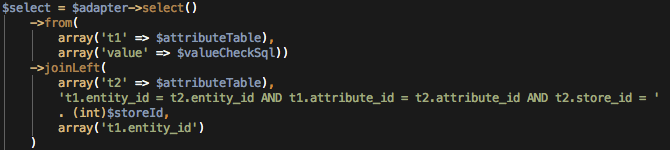
Custom Reports in Magento with Clean_SqlReports

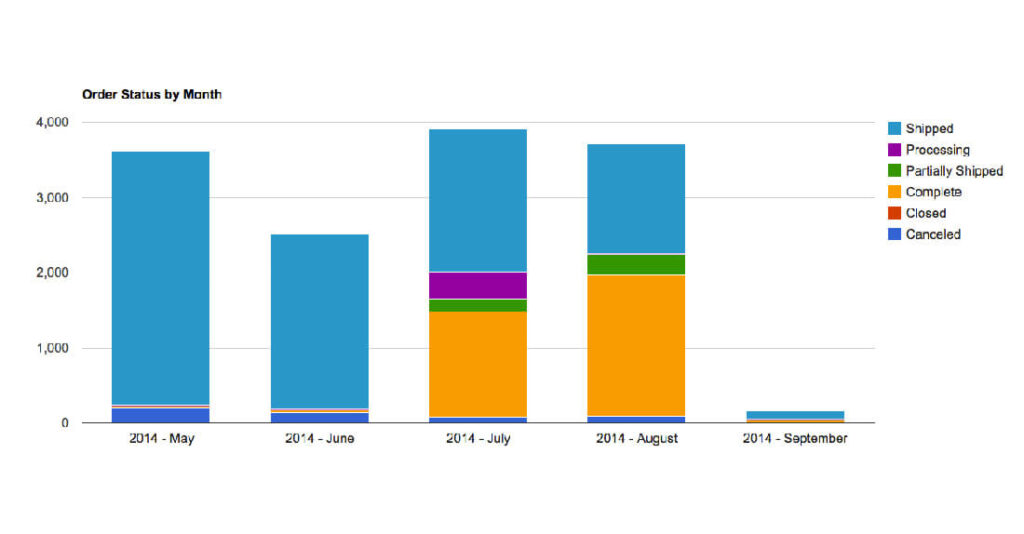
Magento comes with a number of built-in reports covering areas like sales, taxes, customers, products, abandoned carts, and reviews. However many merchants have reporting needs beyond Magento has to offer. For some merchants, a third-party extension like Aheadworks’ Advanced Reports module will do the trick. However, if an existing module doesn’t fit the bill, then you’ll need to build a custom report. Traditionally, a Magento developer would build a report into Magento following the same pattern of Magento’s native reports. However, this approach can take a while and will often be cost-prohibitive.

To make building custom reports an easier task, Kalen Jordan built a module called Clean_SqlReports that allows you to take a MySQL query and automatically turn it into a Magento report. During the Magento Imagine 2014 Hackathon, Kalen worked with a number of others to enhance the module to add support for the Google Charts API, which means you can build some really visual reports. In this blog post, I’m going to demonstrate how to build a few different types of reports using this extension (some examples inspired by the module readme):

Module Setup

First, you will need to install the module: https://github.com/kalenjordan/custom-reports You can install it via modman, Composer, or download a ZIP of the module and copy it into your Magento installation. Once you have the module installed, log into the admin. Since this module runs MySQL code that is entered via the admin, someone with access to add/edit reports could wreak havoc on the site, if they knew the proper MySQL to enter (think TRUNCATE or DROP). To overcome this, go to “System > Permissions > Roles”. You should have at least one role for users that you don’t want to have access to add/edit reports.

Types of Reports

The module has two primary forms of reports:

  • Plain Table – this report type is similar to what you get with Magento’s native reports. You won’t be able to do things like filter by date range and change how the report is grouped, but a business user can export the report to CSV or Excel and do additional filtering in a spreadsheet application.
  • Google Charts API – this report type allows you to use nearly any of the Google Chart types. Check out these examples. Be aware that you need to write your MySQL query to return the data in the format required by be Google chart.

Report #1 – Top 500 Customers by Lifetime Volume

Now that you’ve setup the permissions for this extension, let’s create our first report. For this example, we’re going to grab the top 500 customers and display their lifetime order value, the total number of orders, and the last date they ordered. Go to “Reports > Special Reports”. Click “Add Report”. For the title, enter “Top 500 Customers by Lifetime Volume”. For the “SQL”, enter this query:

SELECT 
    -- Round to two decimal places and prepend with $
    CONCAT('

Now, save the report and run it by clicking on that row.

Report #2 – Order Status

Create a new report with the title of “Order Status”. Select “Pie Chart” from the “Output Type” field. Enter the following SQL:

SELECT 
    sales_order_status.label AS 'Status',
    COUNT(sales_flat_order.entity_id) AS 'Orders'
FROM sales_flat_order
LEFT JOIN sales_order_status ON sales_flat_order.status = sales_order_status.status
GROUP BY sales_flat_order.status
ORDER BY COUNT(sales_flat_order.entity_id) DESC

The “Chart Configuration” field needs to be a JSON object and corresponds to the “Configuration Options” section of the Pie Chart page. Enter this value into the “Chart Configuration” field:

{
    height: 900,
    width: 1100,
    title: 'Order Status',
}

Report #3 – Order Status by Month

Building a single MySQL query that groups data by months is a bit messy, as you have to “hard code” the columns you want have included in the report. In our example, we’re going to hard code the most common order statuses as columns in our select statement. While it is possible to dynamically create columns from statuses, that is outside the scope of this article. Create a new report with the title of “Average Products per Order by Month”, select the “Column Chart” Output Type and then enter this SQL:

SELECT
    -- "Year - Month"
    CONCAT(YEAR(sales_flat_order.created_at), ' - ', MONTHNAME(sales_flat_order.created_at)) AS 'Month',
    SUM(IF(`status` = 'canceled', 1, 0)) AS 'Canceled',
    SUM(IF(`status` = 'closed', 1, 0)) AS 'Closed',
    SUM(IF(`status` = 'complete', 1, 0)) AS 'Complete',
    -- Custom status
    SUM(IF(`status` = 'complete_partially_shipped', 1, 0)) AS 'Partially Shipped',
    SUM(IF(`status` = 'processing', 1, 0)) AS 'Processing',
    -- Custom status
    SUM(IF(`status` = 'shipped', 1, 0)) AS 'Shipped'
FROM sales_flat_order
GROUP BY MONTH(sales_flat_order.created_at)

Enter this value into the “Chart Configuration” field:

{
    isStacked: true, // Important, as this turns the column into a stacked chart
    height: 600,
    width: 1400,
    title: 'Order Status by Month',
    vAxis: {
        title: 'Number of orders'
    }
}

NOTE: Magento saves all records in the database using UTC, so when you run reports based on date, it will be reporting based on UTC, not your local timezone. Magento’s native reports account for this adjustment, but a raw MySQL query does not. However, there is a way to overcome this: use the DATE_ADD function to adjust for your time zone. Assuming you are in central time (and it is daylight savings time), you are UTC – 5. So replace the GROUP BY statement in the above query with this, and voilà, your report now accounts for the timezone difference:

GROUP BY MONTH(DATE_ADD(sales_flat_order.created_at, INTERVAL -5 HOURS))

Conclusion

Now that you’ve seen some of the things that you can do with the Clean_SqlReports module, go build some reports!

, FORMAT(SUM(sales_flat_order.`grand_total`), 2)) AS 'Lifetime Sales', COUNT(sales_flat_order.entity_id) AS 'Orders', customer_entity.email AS 'Email', MAX(sales_flat_order.created_at) AS 'Most Recent Order Date' FROM `customer_entity` LEFT JOIN sales_flat_order ON customer_entity.entity_id = sales_flat_order.customer_id GROUP BY customer_entity.entity_id ORDER BY SUM(sales_flat_order.`grand_total`) DESC LIMIT 500

Now, save the report and run it by clicking on that row.

Report #2 – Order Status

Create a new report with the title of “Order Status”. Select “Pie Chart” from the “Output Type” field. Enter the following SQL:


The “Chart Configuration” field needs to be a JSON object and corresponds to the “Configuration Options” section of the Pie Chart page. Enter this value into the “Chart Configuration” field:


Report #3 – Order Status by Month

Building a single MySQL query that groups data by months is a bit messy, as you have to “hard code” the columns you want have included in the report. In our example, we’re going to hard code the most common order statuses as columns in our select statement. While it is possible to dynamically create columns from statuses, that is outside the scope of this article. Create a new report with the title of “Average Products per Order by Month”, select the “Column Chart” Output Type and then enter this SQL:


Enter this value into the “Chart Configuration” field:


NOTE: Magento saves all records in the database using UTC, so when you run reports based on date, it will be reporting based on UTC, not your local timezone. Magento’s native reports account for this adjustment, but a raw MySQL query does not. However, there is a way to overcome this: use the DATE_ADD function to adjust for your time zone. Assuming you are in central time (and it is daylight savings time), you are UTC – 5. So replace the GROUP BY statement in the above query with this, and voilà, your report now accounts for the timezone difference:


Conclusion

Now that you’ve seen some of the things that you can do with the Clean_SqlReports module, go build some reports!

Avoiding Coding Errors

These techniques cover quite a broad range of problems and show some good practices for debugging common Magento problems. I am going to cover some common practices that I recommend to avoid common coding problems.

Most frequently, when there is a problem in the code of a competent developer, it is a simple problem. The individual has either missed a semicolon, mismatched their opening and closing XML tags mistyped a class or object name, left a comma, bracket, or parenthetical mark without a partner, etc. Because of their simple nature, these types of problems demand a quick solution. No one feels good debugging for an hour only to find out that they accidentally typed a “q” instead of an “a” or an “l” (lowercase L) instead of an “I” (upper case i), and they did not notice because they are rendered so similarly in the current font. Ultimately, this type of problem can be avoided by several simple practices that may seem obvious but can go a long way toward solving the problems you run into.

Recommended Coding Techniques

As with anything in life, there are good coding habits that can be formed that help prevents silly mistakes. When you consider how to avoid spelling, wording, or grammatical mistakes when publishing any comment, email, blog post, or any other piece of written material you will understand the type of practices I am referring to. Using a spell checker and always proof reading your content aloud before publishing it will help to eliminate a large percentage of the problems. In coding, there are similarly simple practices which can save you countless hours.

1. Whenever possible, copy and paste instead of retyping

I recommend this for a number of reasons, consider the case first mentioned where you mistype a character that is hard to spot. That never would happen if you had instead done a copy and paste. This can also save you a significant amount of time when reusing a code block. This will also prevent you from making simple, hard-to-find mistakes. These mistakes can include missing one character or mistyping a word and replace those errors with larger easier to find mistakes like accidentally leaving an entire extra line, multiple extra words, or an extra separator or control character. This type of mistake can be further minimized by becoming more precise in your copying and pasting. e.g. copying no more or less than the portion you need instead of just the entire line or paragraph.

2. Never stop in the middle of coding a section

Once again, this one may seem especially obvious but there have been numerous times where I have been coding something and someone asks a question or I get distracted by email or some other thing. When I am coding now, I do my best to make sure to finish the section of code before moving to something else even for a moment. If you do have to stop in the middle, use the same type of reminder of what you had left to do. One example of this is a TODO on the same line as your cursor.

3. Close opening tags immediately

I generally will close my tag as soon as I open them. This ensures that I don’t have to worry about closing them later. This is applicable to html/xml tags, function calls, class definitions, function definitions, loops, if statements, and more. Often times, editors will do this for you, and that is great. An IDE can also be helpful for checking if a tag is closed because it will usually highlight the companion brace, bracket, or parenthesis for you when your cursor is next to one of these elements.

4. Find a way to not forget semicolons (where applicable)

One possible solution to this challenge is to type the semicolon first and then move your cursor back a space and type the line of code. Another possible solution is to actively think about semicolons for a period of time while coding and building a good awareness and habit of typing them. This is generally more of a newbie mistake but if you do not build a good habit surrounding semicolons, this mistake could continue to require time spent debugging. Fortunately, most of the time, the error message associated with this problem is clear.

5. Follow established coding standards

There are numerous coding standards for programming languages, and each is slightly different stylistically. The key is to follow an established way of formatting your code. This makes spotting mistakes easier and it ensures that others will be able to read your code. It also is easier to do code review if formatting is consistent. It is very easy to get confused if your indentation does not match the actual nesting of code.

6. Make your code easy to understand

This is probably one of the most important aspects of writing bug-free code. Write code that you or anyone else who knows the language will be able to come read and understand at a later time. Double nested ternary operators may save you 4 lines of code and calling a chain of functions directly instead of assigning the value to a variable may seem easier, but a significant increase in legibility for the future is worth these minor inefficiencies/style changes.

7. Comment even slightly unclear code

Generally, when I write a short method I will comment on the method in the doc block. When I write a longer method, I comment inline above each logical section of code and create line breaks to signify the separation. This takes only a few seconds to do each time once you have made it a habit and it can save hours of untangling code later. Keep these comments accurate so that someone coming in later can read the comment and check the code for results. Unit tests take this concept a step further, but in the absence of unit testing, good comments can get you most of the way there for a fraction of the overall time requirement.

The list above is clearly not exhaustive, and some of the items in the list may not be applicable to everyone. I would also recommend the use of a good IDE; this will make some of the above suggestions easy or even unnecessary. The overall goal of the list is to emphasize that embracing good coding practices and habits helps to curb simple mistakes and is the best way to save time debugging. This will leave larger and more challenging bugs as the primary ones in need of attention. These are bugs that either you didn’t write which are buried in the core of the framework or application on which you are working (in our case, Magento) or problems that stem from incorrect or incomplete logic. These types of problems can often require a variety of techniques to debug, especially when the bug is in the code you neither wrote nor have even seen before. Feel free to add tips in the comments that you use regularly to avoid simple coding errors.

An In-Depth Look at Magento Theme Fallback

Magento supports unparalleled theme flexibility and sophistication that allow for incredibly custom branding while still retaining development efficiency and upgrade compatibility. In particular, the theme asset fallback system allows theme developers to only modify the parts of a theme which actually need to be customized. This feature also enables merchants to quickly deploy stylized stores while still retaining features developed for the overall brand.

Current Fallback Structure

Magento Enterprise 1.14 and Community 1.9 introduced a new, more flexible theme fallback mechanism. Each theme can now specify its parent, which can then specify its parent, and so on. This theoretically allows infinite fall back levels instead of the fixed number of fall back “slots” in older versions.

As powerful as this concept is, the core code powering it is relatively straightforward.

Config Discovery

While loading the current area in a controller’s preDispatch() method, a singleton instance of Mage_Core_Model_Design_Configis instantiated. This class’s constructor scans all themes for an etc/theme.xml file, and loads the contents into a in-memory config instance.

Mage_Core_Model_Design_Config::__construct()

The contents of the theme.xml files are not yet interpreted, but the config tree is ready for when the time comes.

Fallback Determination

When a theme asset (translation, layout update file, template, etc) is loaded,Mage_Core_Model_Design_Package::getFilename() is used to determine the actual filesystem path to the file.

Mage_Core_Model_Design_Package::getFilename()

Mage_Core_Model_Design_Package::getFilename() screenshot

The package model tries each theme in the fallback path, then finally falls back to base/default if all else fails. The fallback path itself, however, is generated by Mage_Core_Model_Design_Fallback::getFallbackScheme() as seen below.

Mage_Core_Model_Design_Fallback::getFallbackScheme()

Mage_Core_Model_Design_Fallback::getFallbackScheme() screenshot

For compatibility with themes developed before 1.14/1.9, this method looks for the presence of a node in the design config for the current area/package/theme (which, of course, was directly populated from the contents of that theme’s theme.xml).

In the event that the theme does specify a parent node (and therefore opts-in to the new fallback logic),Mage_Core_Model_Design_Fallback::_getFallbackScheme() walks up the chain of parent nodes, starting from the current theme’s parent.

Mage_Core_Model_Design_Fallback::_getFallbackScheme()

Otherwise, _getLegacyFallbackScheme() takes over and emulates the old fallback behavior.

Mage_Core_Model_Design_Fallback::_getLegacyFallbackScheme()

This method returns a fallback path of the following form:

  1. First check the theme specified as default in System Configuration
  2. Then check the /default theme

Theme Overrides

In the event that a translation/template/skin/layout override is specified in System Configuration, the theme fallback is calculated in the same way, but the overridden file type follows an independent fallback path starting with the configured override theme.

Summary Flowchart

Considering the new theme fallback capabilities, current versions of Magento will use this fallback path to load theme asset files.

Classic Fallback

Magento versions before Enterprise 1.14 and Community 1.9 used much simpler, albeit far less powerful and flexible, fallback logic.

Mage_Core_Model_Design_Package::getFilename() from Enterprise 1.13

Just as the legacy fallback logic used in current versions, the classic fallback logic simply checked the current theme for the given file type, the default theme set in System Configuration, the hard-coded /default theme, then finally fell back to base/default.

With this in mind, classic versions of Magento will use the following fallback path.

Summary

By allowing merchants to configure a chain of overriding themes combined with the ability to configure the current theme at the store view level, Magento provides a powerful and efficient mechanism to customize individual stores or landing pages while ensuring that core theme assets are consolidated and centralized. Additionally, Magento Enterprise 1.14 and Community 1.9 support endless flexibility and scalability by providing support for infinite levels of theme fallback.

Compiling Sass with Phpstorm

When we built the new Magento responsive theme, we decided to use Sass as the CSS pre-processor and Compass as the compiler (technically known as a transpiler). Sass is the base syntax that supports mixins, variables, and nesting and Compass is a compiler that extends Sass’s capabilities by adding CSS3 mixins that we used to make the responsive theme compatible with older browsers. Here is the TL;DR infographic:

You can read all about the basics of working with the new responsive theme over at the Magento knowledge base. In this article, we’re going to take a more in-depth look at how to compile with Compass on the command line and via PhpStorm.

This article assumes that you’ve gone through the Magento RWD documentation and you have a custom Magento theme setup at skin/frontend/custompackage/customtheme.

Compass on the command line

Before you can compile with Compass, you need to install the command-line utility. After you’ve installed Compass, you can compile by running this command:
compass compile <MAGENTO_DIRECTORY>/skin/frontend/custompackage/customtheme
This command will compile your .scss files into .css files, but you have to run this command every time you make a change to your .scss files. To automatically re-compile your .scss files every time there is a change, you can run this command:
compass watch <MAGENTO_DIRECTORY>/skin/frontend/custompackage/customtheme

While it is valuable to know how Compass works on the command-line, many developers use their IDE or a standalone GUI app (like Scout or CodeKit) to compile with Compass. If you are going to do a lot of frontend development with Sass/Compass, I could encourage you to experiment with your different options and choose the approach that best integrates with your workflow. I use PhpStorm, so that is what I use to compile with Compass.

Compiling Compass in PhpStorm

PhpStorm seems to have become the de facto IDE for Magento backend developers, due to its excellent support for features like syntax highlighting, auto-completion and debugging. However, I was skeptical about using a Php-oriented IDE for front end development, as my previous experiences with robust IDEs like Eclipse/PDT provided to be clunky. Prior to PhpStorm, I used apps like CSSEdit/Espresso/TextMate for front end development. However, I found PhpStorm to be a joy to for front end development, as it offers features like CSS/HTML validation, Sass variable auto-completion, and rapid HTML markup creation via it Live Templates. It is now my IDE for frontend and backend development.

PhpStorm has a feature called “File Watcher” that allows you to automatically run Compass any time you change a .scss file. The way this feature works is that any time you make changes to .scss files in PhpStorm, PhpStorm will run a command line call to “compass compile”. Here are the steps for setting up this feature:

  1. Go to “PhpStorm > Preferences” (Cmd + ,)
  2. Type “File Watchers” in the filter input, click the “+” icon, and then click “compass scss”
  3. Configure the File Watcher with these settings:
    Notable settings:

    • Immediate File Synchronization: Uncheck this option so that PhpStorm doesn’t compile until you actually save a file. It can get really annoying if PhpStorm is trying to recompile as you’re typing.
    • Trigger watcher regardless of syntax errors: PhpStorm is smart. It knows when you have errors in your code, and you can configure the File Watcher to only compile when your code is error-free. However I find that feature to be confusing — when I had it enabled, I would commonly make a change, save the file, flip over to the front end to wait for my CSS to refresh (via LiveReload), only to realize a minute later that the .scss file wasn’t compiling due to an error. With this option disabled, PhpStorm will try to compile your .scss file and will throw an obvious error, which I find to be more helpful:
    • Program: This tells PhpStorm which command line utility to run. Since PhpStorm is just running the command line “compass” utility, enter “compass” into this field.
    • Arguments: This field includes the arguments that get passed to the “compass” command above. This field needs to include the location of your custom theme, relative to the root of your PhpStorm directory.
    • Working directory: PhpStorm will take the value from this input and use it as the working directory when running the compass command. NOTE: You must insert this variable using the “Insert Macro…” button. If you just type the “$ProjectFileDir$” text, PhpStorm won’t recognize it.

    So based on the configuration screenshot above, PhpStorm will essentially run these commands any time a .scss file is changed:

    cd /Volumes/Server/www/magento/magento_1.14_compass
    compass compile skin/frontend/custompackage/customtheme/scss

If you have multiple themes for which you need to compile .scss files, you simply need to setup File Watchers for each theme. For example:

If you follow these steps, your .scss files should be compiled any time you make a change in PhpStorm!

Contact Us